
How to Import Multiple LUTs and Create Your Own LUTs
LUTs stand for Look Up Tables. But what does that even mean? Basically, LUTs contain “basic math” which when applied to a photo or video can alter the colors, exposure, and more.
It’s important to note that you cannot expect LUTS to magically fix all your footage and make it look perfect. Not one LUT fits all. But you can certainly apply a LUT in Premiere Pro and then adjust it to fit your video using the control sliders in the Lumetri Color panel.
Do LUTS work on all footage? Sometimes. But LUTs are best used when they are designed for a particular camera profile. For example, LUTS for Canon C-LOG footage, S-LOG, or LUTS for D-LOG Mavic Pro Aerial shots. There are many different packs available online for particular looks. Some LUTS are designed to simply improve the exposure and the contrast and others can achieve particular cinematic looks.
So how exactly do you import a bunch of LUTS at once into your Lumetri Color panel?
Importing a Pack of LUTs
As you’ve likely experienced, Premiere Pro only allows you to import 1 LUT at a time from the Basic Correction section or the Creative section of the Lumetri Color Panel. In order to import more than 1 LUT you need to create custom folders from within Adobe’s Application support folder. To do this, be sure to first close Adobe Premiere Pro.
If you’re on a MAC go to this file path (I recommend going to Finder > Go > Go To Folder):
/users//Library/Application Support/Adobe/Common
If you’re on a PC go to this file path:
C:\Users\\AppDara\Roaming\Adobe\Common
Then within the Common folder create a new folder called "LUTs” and within that folder create two more folders, one called “Technical” and one folder called “Creative”
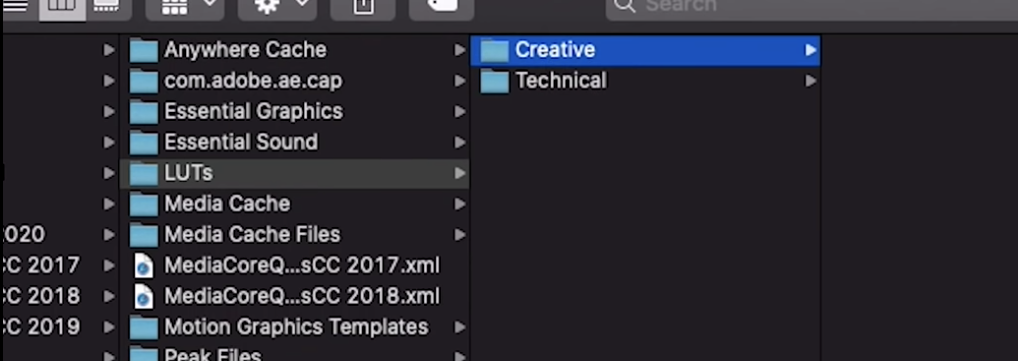
If you want to use the Creative tab in Lumetri, drag and import all the LUT files into the creative folder. At timecode, 4:14 in the video I demonstrate how to do this whole process.
How to Create and Save Your Own LUT
I recommend using the Lumetri Scopes panel in Premiere Pro to adjust the brightness level of your clip. If you’re new to Lumetri Scopes, I recommend watching this video.
Once you make the adjustments to your clip, click on the hamburger menu next to Lumetri Color and export your LUT as a .cube file.

You can then save the LUT file to your local computer.
And that’s all there is to it. If you have any questions, be sure to leave a comment below. Cheers!