How to Create Cyberpunk Color Grading and Titles
In this new tutorial we’re going to learn how to create a Cyberpunk look in your film in SECONDS in Premiere Pro [No After Effects is Involved]! The Cyberpunk effect has been used in lots of movies nowadays, for example, Blade Runner 2049 or Ghost In The Shell.. Most of the color effects were achieved through practical gels on lights, but you can in fact apply lots of color effects and aberrations in post production to add a cyberpunk feel o your film. And that is what you’re going to learn in this tutorial.
Step 1: Use Lumetri Color to color grade a shot
With your video clip selected in the timeline, go to Window > Lumetri Color. From the Basic Corrections section, make the adjustments to the following sliders.
Exposure: Increase the exposure because it brings up the shot in the light
Highlights: Increase the highlights to make the intensity of the natural lights higher.
Shadows: Lower the shadow value for contrast. Caution: Not every shot needs to be contrasty. The more contrast the more distortion it’ll add to a shot.
Blacks: Lower the blacks to crush the blacks and make them darkers. Caution: don’t crush too hard, beware of the noise it adds to the shot!
Saturation: Increase the Saturation to pop the color!
Tint: Move the tint slider to the pink tones. Increase the pink tint. And for Gal, it’s always PINK!
You can press the fx icon from Lumetri Color on and off to see the before and after comparison:
Step 2: VR GLOW
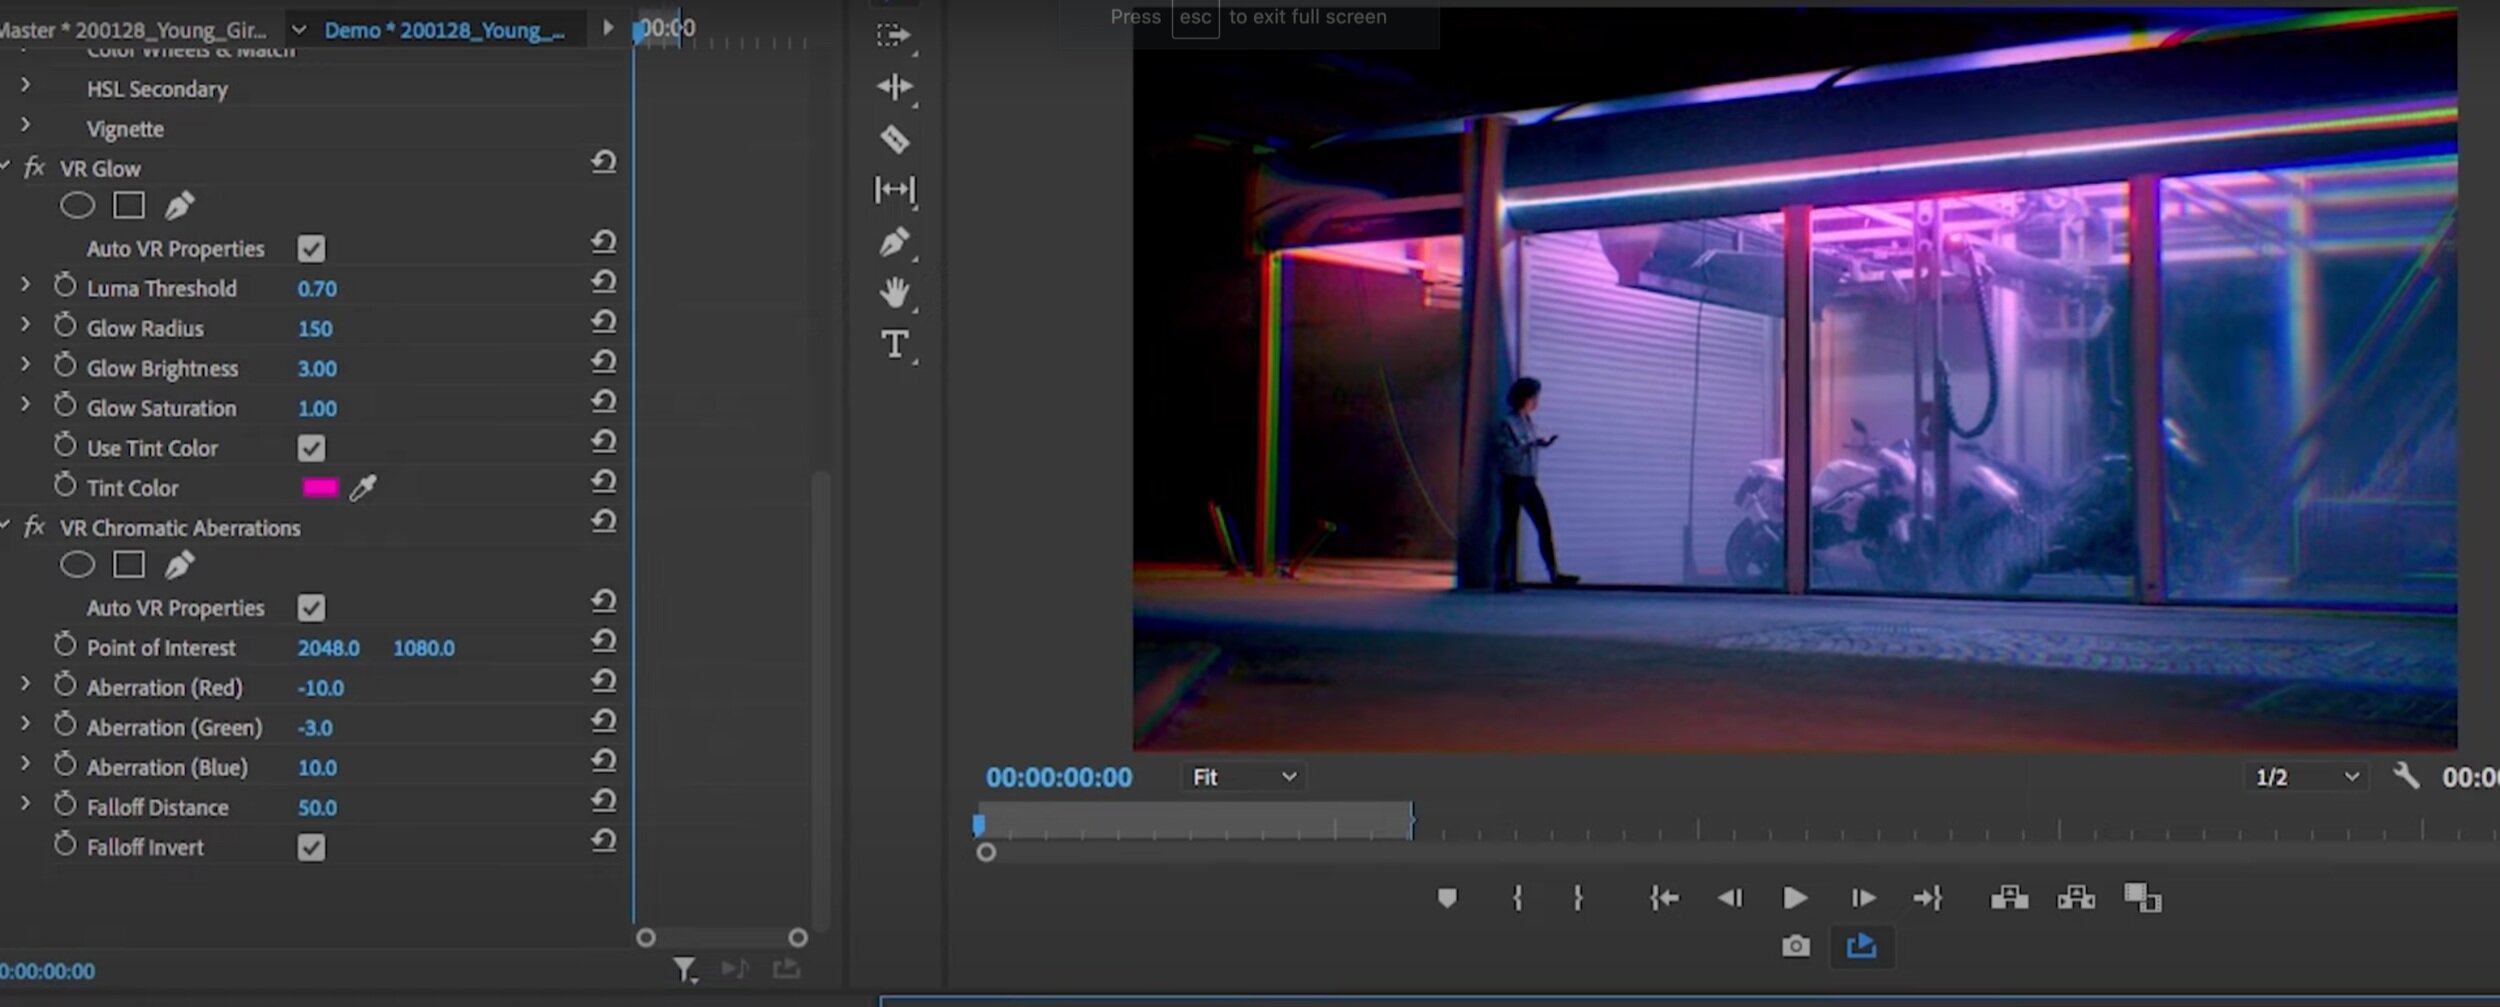
You can find the VR Glow effect by searching within the Effects panel. VR Glow is an immersive video effect for 360 videos, but it can also be applied to regular footage too! After you drag the VR Glow effect to your your footage go to the Effect Controls panel and make these adjustments:
Lower the Luma Threshold to intensify the glow from the lights!
Increase the Glow Radius to increase the glow’s size.
- Test the value on your own shot to get the best effect!Increase the brightness!
Check the box “Use Tint Color”
Pick a color to tint the glow! Select the color box to choose the color you want. Of course, we will keep the neon glow to Gal’s Neon Pink! But also because Pink is more closer to the Cyberpunk classic look.
If you think this is good enough, you can pretty much stop here. But as a Gal’s subscriber, of course you want to do more!
Step 3: VR Chromatic Aberration
Next, search for the VR Chromatic Aberration from the Effects panel. Once you apply it to your footage, your shot will immediately look edgy. And here’re some adjustments we need to make:
Fall Off Invert – Check. This will make the RGB to fall off to the edge of frame instead of in the middle.
Adjust the Aberration (Red, Green, Blue). Example: Setting Aberration Red to -56 to show how far off Red falls off to the edge. Gal’s Suggested Value for this shot is: Red -10, Green -3, Blue 10
**Caution for VR Chromatic Aberration: because it is a VR effect, there will be distortion on the edge. One way to fix it is crop in and frame your shot tighter. So 4k footage in a 1080p timeline will serve better.
Step 4: Cyberpunk Titles and Effects
Using the AEJuice Cyberpunk HUD pack you will be able to access hundreds of Cyberpunk effects. You can use the promo code: GAL10 to get 10% off all of their products. In order to use their effects, download the AE Juice Manager and then open Premiere and go to Window > Extensions > AE Juice Pack Manager.
From the AE Juice Pack Manager click on Cyberpunk HUD and you’ll be able to browse thier Cyberpunk Animated Stories, Background, Overlays, Text Animation and Sound FX. Watch at timecode 8:42 in the tutorial to learn how to use the Cyberpunk pack.
To apply any effect, double click and apply it to your timeline. Then you’ll be able to go to the Essential Graphics panel to make adjustments to the effect or title.
Lastly, you can become Gal’s Patreon, so you can get her Cyberpunk Preset for free! If you have any questions, just leave a comment below or on the Video on YouTube. As usual, keep creating better videos with Premiere Gal!


